How can I dynamically select the participants/approvers in a parallel task approval process in Nintex Workflows for Office 365?
I recently created a solution where our customer wanted a task approval process to be sent to multiple users based on a user’s selection of an area of responsibility. For example if selecting the “Finance” department the approval task may be sent to Jon Smith and Jane Doe. However, if the “HR” department was selected then the approvals may go out to Fred Young and Joe Mandoza. The departments and their approvers exist in a SharePoint list. In this post I’ll describe how I solved this problem. I hope you find it useful and that it saves you much heart ache.
Creating the Department Approvers list.
First, let’s create a SharePoint list that contains a column for the department (single line of text) and one for the approver (person).
I filled in some data so that if I select the Finance department then two approvers ,Clements, Chris and Chris Clements will be selected and added as participants in the task process.
Creating the primary list.
Next, let’s create a list to which we will attach our Nintex workflow. This list will have one lookup column that will be linked to our Department Approvers list. Let’s call our primary list, Quarterly Reports.
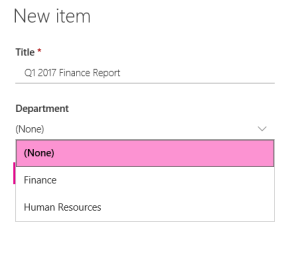
Here is what the new item form looks like. Note the look up column displaying the available departments from Department Approvers.
Creating the “Start Approval Task Process” workflow.
Start by creating a new list workflow on the Quarterly Reports list. Call the workflow Get Approvals.
Step 1: Query the list to get the approvers based on the selected department.
Use the query list action with the following configuration:
We are going to select the approver column from this Department Approvers list where the department column matches the selected department on the quarterly reports list. Configure the action as shown below.
Note that we are selecting the “User Name” property of the approver column. In Office 365 this will be the person’s E-mail address. Also notice that I created a workflow variable of the collection type, colDepartmentApprovers to store the results in.
Step 2: Transform the colDepartmentApprovers variable into a dictionary
If you were to run the workflow now and observe the contents of the colDepartmentApprovers variable you would see that its format is that of a JSON object called “Approver” which contains an array of “UserName” key value pairs.
[{"Approver":[{"UserName":"Chris.Clements@mydomain.com"},{"UserName":"cleme_c@mydomain.com"}]}]
But look closely at the leading and trailing brackets []. This means that this is an array of JSON approver objects each with its own array of key value pairs.
We need to crack open this string to get at the E-mail addresses inside but it is going to take several steps to get there so grab a beer and chill.
Let’s add the “Get Item from Collection” action.
Configure the action as shown below:
Notice that I hard-coded the 0 index counter. This means that I will always fetch the first item in the collection. I realize that if a user were to create a second record for the “finance” department in the department approvers list that this workflow would not pull in the approvers listed in that row. To handle that case we would need to loop across the colDepartmentApprovers variable. However, to keep this post concise I will only handle one row of approvers per department.
In the output section of this action I created a workflow variable called “dicDepartmentApprovers“. This variable will hold whatever was in the first position (the 0 index) of the colDepartmentApprovers variable.
Let’s run the workflow again and check out the contents of dicDepartmentApprovers.
{"Approver":[{"UserName":"Chris.Clements@mydomain.com"},{"UserName":"cleme_c@mydomain.com"}]}
We were successful at pulling the first and only “Approver” row from the collection. The leading and trailing brackets “[]” are gone! Now we need to get at the array of key value pairs containing the E-mail addresses.
Step 3: Parse the Approver object into a dictionary
Let’s add the “Get an Item from Dictionary” action.
Configure the action as show below:
In this step I am selecting the “Approver” path from the dictionary called dicDepartmentApprovers however, I insert the resulting data back into the collection variable. What’s going on here? Let’s run the workflow again and see what the data in the colDepartmentApprovers variable looks like.
[{"UserName":"Chris.Clements@mydomain.com"},{"UserName":"cleme_c@mydomain.com"}]
Hopefully you see that we are again dealing with an array/collection of data. Selecting the “Approver” value from the dictionary in yields a collection of “UserName” values. This time we are going to loop across this collection and crack out the individual E-mails.
Step 5: Looping across the colDepartmentApprovers collection
Add the “For Each” action.
Configure the action as shown below:
I specified our collection variable, colDepartmentApprovers, as the input collection across which we are going to loop. For the output variable I created a new workflow variable called “dicUserName“. This variable holds the currently enumerated item in the collection. In other words, it is going to hold a single instance of the “Username” key value pair each time through the loop. Its value will look something like this on the first trip through the loop: {"UserName":"Chris.Clements@mydomain.com"} and then it will look like this: {"UserName":"cleme_c@mydomain.com"} during it’s second loop.
Given that the value of the dicUserName is dictionary we can use the “Get an Item from Dictionary” and specify the “UserName” path to arrive at the E-mail address. Let’s take a look.
Add the “Get and Item from Dictionary” action. Be sure to place this action inside of the for each looping structure.
Configure the action as shown below:
Again we use the Item name or Path setting to retrieve the value. In this case we set “UserName” and save the results into a new workflow variable called txtApproverEmail. Its contents look like this:
VICTORY! Well, almost. Remember we want to our approval task to go out to both E-mail addresses at once. We are going to need to concatenate our E-mail addresses into a format that is acceptable to the “Start a task process” action.
Let’s add the “Build String” action.
Configure the Action as shown below:
In this action I am stringing together our E-mail address with a new, empty workflow variable called txtCombinedApproverEmail. I take the result of the concatenation and run it back in the txtCombinedApproverEmail variable. It works like this:
First time through the loop where txtApproverEmail = “chris.clements@mydomain.com” and txtCombinedApproverEmail is empty.
chris.clements@mydomain.com;
The second time into the loop where txtApproverEmail = “cleme_c@mydomain.com” and txtCombinedApproverEmail = “chris.clements@mydomain.com;”
cleme_c@mydomain.com;chris.clements@mydomain.com;
PRO TIP: Notice that there is NO space between the E-mail addresses and the semicolon. You are warned.
Step 6: Beginning the Approval Task
Finally, we are at the last step. That is to create the “Start a Task Process” action and assign our txtCombinedApproverEmail in the Participants field. Remember to create this action outside of the for each loop.
And the configuration:
All that I am really concerned with here is setting the participants field to my workflow variable txtCombinedApproverEmail. Let’s run the workflow and see if we get our task assigned to two approvers at once based on our selected “Finance” department.
Ah, and there you have it:
This is the entire workflow I created in this post:
Closing Thoughts
I have to be honest. This feels like it shouldn’t be this hard to do in a tool such as Nintex for Office 365. Seven steps? Really? If I were a “citizen developer” there is no way I could have pulled off a task like this. Knowledge of JSON encoding is essential.
Chris


Pretty complicated, but seems to be working. It really shouldn’t be this complicated, should it? 🙂
How would you go about and transfer this “solution” from one site to another? You can export the Nintex Workflow, but what happens to the Approvers list? Any possibility to stage these changes? Exporting the site is possible, but wouldn’t work on a Publishing site. Additionally exporting the site would export a lot of stuff you don’t really want.
LikeLike
You’re right. It just seems harder than it should be. We’ve had mixed results using tools such as MetaLogix and ShareGate to migrate Nintex Office 365 workflows and lists from one site collection to another using ShareGate. Most lists, columns, workflows, and actions come across but often they are broken. You can never really tell what is going to happen. I usually just end up recreating it all. I don’t even trust the copy/paste process in Nintex workflows for Office 365 🙂
LikeLike
Thanks for your reply – at least I’m not alone in thinking that staging is not a solved problem. ShareGate is great but of course it will get problems when you start using complicated things in a site.
LikeLike